How to Build an Adirondack Chair: Parts, Materials and the Cuts That Matter
An Adirondack chair is a fine first piece of outdoor furniture. It is also a project where the angles have to come from a tested plan. Here is why.
An Adirondack chair is built from ordinary boards, screws and a handful of cuts. Most of it is within reach of anyone who has built a bench or a planter. What makes it harder than it looks is that the seat slope, the back angle and the leg cuts all depend on each other. Get one angle wrong and the chair rocks, tips back or sits like a park bench.
This guide won't replace a plan. It walks through the parts, the materials and the cuts so you can read a plan with confidence and spot a bad one before you buy lumber.
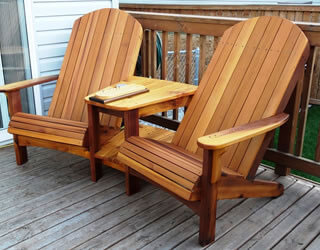
The parts of an Adirondack chair
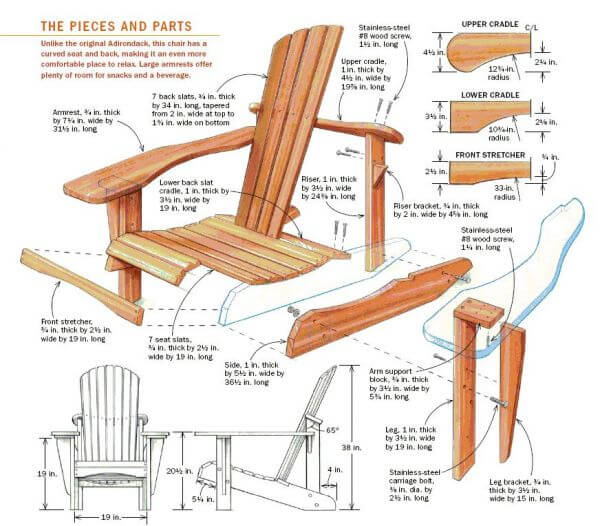
Designs vary, but nearly all of them share the same parts:
| Part | What it does | The cut that matters |
|---|---|---|
| Back legs (seat stringers) | Long sloped pieces that carry the seat and set the recline | Angled cuts at both ends; these set how the chair sits on the ground |
| Front legs | Hold up the front of the seat and the arms | Square ends, cut as a matched pair |
| Seat slats | Form the seat | Square crosscuts, all the same length |
| Back supports | Cross pieces the back slats screw to | Their position sets the back angle |
| Back slats | The tall back | Top ends cut to a curve or a fan shape |
| Arms | Wide flat boards for drinks and elbows | Shaped ends; must sit level |
| Arm brackets | Small blocks under the front of the arms | Short angled cuts |
Materials: wood, screws and finish
An Adirondack chair lives outside, so the wood choice matters more than on indoor furniture. The USDA Forest Products Laboratory's Wood Handbook groups woods by how well their heartwood resists decay (Table 14-1):
- Resistant or very resistant heartwood: western redcedar and the other cedars, white oaks, black locust, and old-growth redwood and baldcypress.
- Moderately resistant: Douglas-fir, western larch, and young-growth redwood and baldcypress.
- Slightly or not resistant: most pines, spruces, true firs and maples. These need preservative treatment or a well-kept paint finish to last outside.
Note that the ratings are for heartwood. The pale sapwood of any species decays quickly. Pressure-treated pine is the common budget choice; it is often sold wet, so let it dry before you finish it.
Use screws rated for exterior use (stainless steel or coated), long enough to go well into the second board. Exterior-rated glue at the joints is optional but helps stop squeaks.
For the finish, the Wood Handbook gives typical service lives for exterior finishes (Table 16-5):
| Finish | Look | Typical service life |
|---|---|---|
| Water-repellent preservative | Grain visible, fades to gray | 1 to 3 years |
| Semitransparent stain | Grain visible, colored | 4 to 8 years on rough-sawn or weathered wood |
| Solid-color stain | Grain hidden | 6 to 15 years |
| Paint (primer + 2 topcoats) | Grain hidden | 10 to 20 years |
Clear varnish is a poor fit for a chair that sits in the sun: the Handbook notes varnish in direct sunlight generally needs refinishing every 1 to 2 years. It can last for years on furniture that is covered when not in use.
Tools you need
- A circular saw or miter saw for the straight and angled cuts.
- A jigsaw for the curved back and the arm ends.
- A drill/driver, a countersink bit and a square.
- Two or more clamps to hold parts while you drill.
- A sander or sanding block. Every edge of a chair gets touched.
The cuts that make or break it
The back legs. The angles at each end of these two long pieces decide how far back the seat tilts and whether both feet sit flat. Cut one, check it against the plan's drawing, then trace it onto the second board so they match exactly.
The back angle. The back slats lean back from the seat at an angle set by where the back supports are fixed. Move a support an inch and the back angle changes. This is the most common place a home-drawn design goes wrong.
The curves. The top of the back and the front of the arms are curves. Make a full-size template from cardboard or thin plywood, trace it onto every piece and cut with a jigsaw. Sand to the line.
The arms. Arms must sit level side to side and front to back. If they don't, the front legs or brackets are off, not the arms.
Typical assembly order
- Cut and shape the two back legs as a matched pair.
- Attach the front legs to the back legs, checking square.
- Screw on the seat slats with even gaps.
- Fix the back supports, then the back slats, starting from the center.
- Attach the arm brackets and arms, checking level.
- Sand the edges and apply the finish to all faces, including the ends.
Why you need a plan for this one
You can sketch a bench on a napkin. A comfortable Adirondack chair is different, because comfort comes from angles that someone already worked out by building and sitting in a prototype. A good plan gives you those angles, full-size patterns for the curves and a cut list in actual lumber sizes. Before you buy one, check that it shows a finished chair someone built from it, and that its cut list uses ¾ and 1½ inches, not 1 and 2.
- The plan shows the finished chair actually built, not just a drawing.
- The cut list uses actual board sizes (¾ and 1½ inches).
- Angles are given in degrees or as full-size patterns.
- Templates are included for the curved back and arms.
- The materials list names the screws and their lengths.
Adirondack chairs also made our list of 9 things worth building instead of buying, along with a few other outdoor projects.